The Cardboard Castle Conundrum
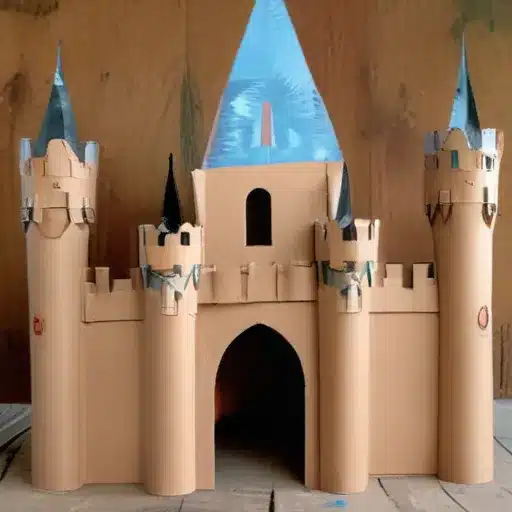
Alright, folks, gather ’round! Today, I’m going to show you how to turn your humble cardboard scraps into a majestic castle fit for a king (or queen, let’s be inclusive here). Now, I know what you’re thinking – “Cardboard? Really? That’s so…basic.” But trust me, with a little creativity and elbow grease, you can transform those boring brown boxes into a veritable palace.
You see, I’ve always been a bit of a DIY enthusiast. I remember when I was a kid, my parents would always be getting on my case for hoarding all those cardboard boxes from our Amazon deliveries. “David, you need to recycle those!” they’d say. But I just couldn’t bring myself to part with them. There was something about the sturdy, versatile nature of cardboard that spoke to my inner builder.
And so, I started tinkering. I’d grab a box here, a tube there, and before you knew it, I had constructed the most epic pillow fort known to man. My friends were in awe, their jaws dropped as they gazed upon my cardboard masterpiece. “Dude, how did you do that?” they’d ask, eyes wide with wonder. And that, my friends, is when the idea for this cardboard castle project was born.
Gather Your Cardboard Arsenal
Alright, let’s get down to business. The first step in your cardboard castle conquest is to amass your materials. You’re going to need a good ol’ collection of cardboard – boxes, tubes, sheets, whatever you can get your hands on. Don’t be afraid to raid your recycling bin, scour your neighborhood for discarded packaging, or even hit up your local grocery store and ask for their cardboard castoffs.
Now, I know what you’re thinking – “But David, won’t all this cardboard be, you know, brown and boring?” Fear not, my creative cohorts! That’s where the real fun begins. You can jazz up your cardboard with a variety of paints, markers, glitter, and other decorative elements. Let your inner artist run wild!
And speaking of materials, don’t forget the other necessities – scissors, glue, tape, and any other adhesives you might need to bring your cardboard castle to life. Trust me, you don’t want to be halfway through your construction and realize you’re out of duct tape. That would be a royal disaster.
Sketch Out Your Cardboard Castle Design
Alright, now that you’ve got your cardboard arsenal assembled, it’s time to start planning. Grab a pen and paper (or fire up your digital drawing app of choice) and start sketching out your dream castle design.
What kind of towers do you want? How about a moat? Maybe a drawbridge? The possibilities are endless, my friends. Let your imagination run wild! Do you want to channel your inner medieval architect and go for a more traditional Gothic look? Or perhaps you’re feeling a bit more whimsical, and you’d like to create a castle straight out of a fairytale?
As you’re sketching, start thinking about the key structural elements you’ll need to bring your vision to life. Where will the walls go? How can you create those towering turrets? Don’t be afraid to get a little crazy – remember, the beauty of cardboard is that it’s incredibly versatile and forgiving.
And don’t forget to consider the scale of your castle. Are you building for yourself, your kids, or perhaps even a larger-than-life installation? Measure out your space and make sure your design will fit. After all, you don’t want to end up with a castle that’s too big for your living room (or, on the flip side, a teeny-tiny fortress that’s only fit for your hamster).
Construct Your Cardboard Castle
Alright, time to get down to the nitty-gritty – the construction phase! This is where the real magic happens, my friends.
First, start by cutting out your basic shapes – the walls, the towers, the turrets, and any other key architectural elements you’ve sketched out. Don’t be afraid to get a little rough with the scissors; remember, this is cardboard, not fine china.
As you start assembling your castle, get creative with the ways you connect the pieces. Sure, you could just use glue and tape, but where’s the fun in that? Try experimenting with slits, tabs, and other ingenious cardboard-specific techniques to create a sturdy, interlocking structure.
And don’t forget to leave room for those all-important details – windows, doors, battlements, and maybe even a few decorative flourishes. This is your chance to really bring your castle to life and make it your own.
Now, I know what you’re thinking – “But David, won’t all this cardboard be…well, kind of flimsy?” A fair point, my friends. But fear not, for I have a secret weapon up my sleeve: reinforcements!
By strategically placing cardboard tubes, rolls, and even crumpled newspaper inside your castle walls, you can create a sturdy, load-bearing framework that will keep your creation from collapsing under its own weight. It’s like building a castle out of Legos, but way cooler (and a lot less painful if you step on it).
Decorate Your Cardboard Castle
Alright, now that your castle is standing tall and proud, it’s time to unleash your inner artist and really make it shine. This is where the real fun begins, my friends.
Grab those paints, markers, and glitter, and start transforming those plain brown boxes into a veritable kaleidoscope of color and creativity. Maybe you want to go for a classic medieval look, with rich jewel tones and intricate designs. Or perhaps you’re feeling a bit more whimsical, and you’d like to create a castle straight out of a children’s fairytale, complete with pastel hues and glittery accents.
Don’t be afraid to get a little crazy with your decorations. Maybe you want to add some faux stained glass windows, or create a moat filled with shiny blue “water” (aka glitter and construction paper). The options are truly endless, my friends.
And let’s not forget about the little details that can really make your castle shine. Maybe you want to create some miniature furniture, like a throne fit for a king (or queen). Or perhaps you’d like to add some tiny flags or banners to really make your creation feel like a proper fortress.
Showing Off Your Cardboard Castle
Alright, folks, the moment of truth has arrived – it’s time to unveil your masterpiece to the world! Whether you’re building this castle for yourself, your kids, or as a grand display for your community, the sense of pride and accomplishment you’ll feel is truly unparalleled.
Imagine the look on your friends’ and family’s faces as they lay eyes on your towering cardboard creation. “Whoa, dude, you made this?” they’ll exclaim, their jaws dropped in awe. And that, my friends, is the true magic of this DIY project – the joy of creating something truly remarkable out of the most mundane of materials.
But don’t just keep this cardboard castle all to yourself – share it with the world! Snap some photos, shoot a video, and show off your handiwork on social media. Who knows, you might even inspire others to embark on their own cardboard castle adventures.
And if you’re feeling really ambitious, why not take your cardboard creations to the next level? Maybe you could organize a community-wide cardboard castle building event, or even enter your masterpiece in a local art show or festival. The possibilities are endless, my friends.
So what are you waiting for? Grab those cardboard scraps, unleash your inner architect, and get to building! I can’t wait to see the amazing castles you all create. Happy crafting, my fellow DIY enthusiasts!

